

📋 In This Guide
This guide is written for store teams who want a clear, repeatable process.
When to Use This Guide
Use this guide when you need to:
- Add a new rug to your digital inventory.
- Edit an existing rug’s details, photos, or pricing.
- Republish a product after making changes.
- Unpublish a product to remove it from public view.
- Export a Shopify-ready CSV for your store.
- Troubleshoot common issues.
Quick Start: The 10-Step Workflow
For a fast overview, here is the end-to-end process:
- Log In: Access your RugSnap dashboard.
- Digitize New Product: Start a new rug entry.
- Enter Details: Add the product title, color, and all size variants with price and stock.
- Process Master Photo: Take and process a high-quality photo for each unique rug shape.
- Add PDP Photos: Upload at least two additional photos (e.g., texture, corner, backing).
- Generate AI Content: Create the product description and lifestyle images using AI.
- Review & Mark Ready: Complete the readiness checklist and mark the product as ready.
- Publish: Generate public image links and prepare the product for export.
- Export Shopify CSV: Download the CSV file for your Shopify store.
- Import to Shopify: Upload the CSV to Shopify and review the listing before making it live.

Before You Start
What You Need
- Your RugSnap login details
- Email or username.
- Password.
- Product information
- Product number or product title.
- Main color name, such as
Ivory / Navy Blue. - Rug shape and dimensions.
- Price and stock quantity for each size variant.
- A stable internet connection
- Avoid closing the browser while RugSnap is processing or publishing.
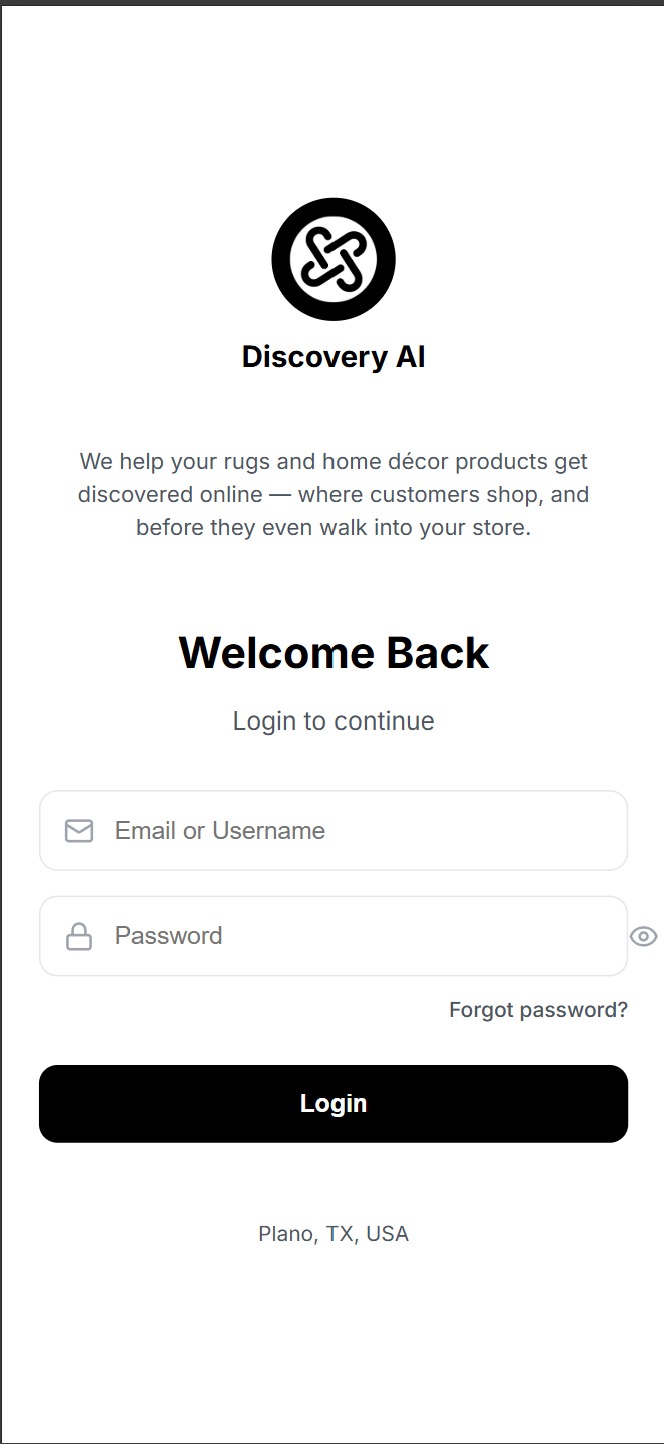
1 Log In to RugSnap
- Open the RugSnap admin page.
- On the Welcome Back screen, enter your Email or Username.
- Enter your Password.
- Use the eye icon if you need to show or hide the password while typing.
- Select Login.
- After a successful login, RugSnap opens your store dashboard.

2 Understand the RugSnap Dashboard
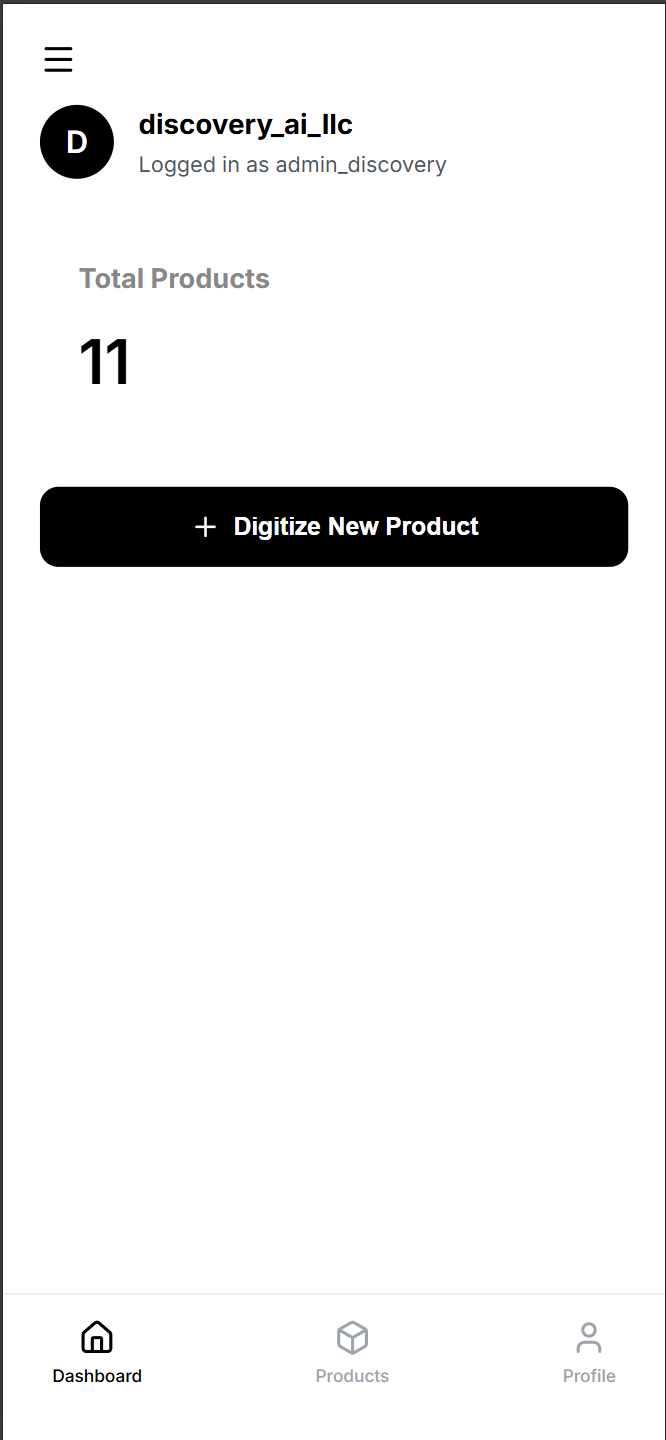
After login, you will see your store area with your store name and account username.
Main Navigation
- Dashboard
- Shows your total product count.
- Provides the Digitize New Product button.
- Products
- Shows your product list.
- Lets you search, filter by status, open products, and export published products.
- Profile
- Shows store/account information.
- Provides Resync Products if images or product data need to refresh locally.
- Provides Sign Out.

Product Statuses
- Draft — The product is still being prepared. The readiness checklist may still have missing items.
- Ready — All required checks have passed. The product is ready to publish.
- Published — The product has public image links. You can export a Shopify CSV. You can unpublish if needed.
3 Digitize a New Rug From the Home Dashboard
Use this flow when you are adding a rug to RugSnap for the first time.
Photo Guidelines for Best Results
- Even Lighting: Make sure the lighting is bright and even across the rug to avoid harsh shadows.
- Good Angles: Avoid taking pictures from very low or extreme side angles. The full rug should be visible and flat.
- Steady Camera: Keep the camera steady to ensure the rug outline is clear and in focus.
- Calibration Card: If using the official Discovery calibration card, place it on the floor a few inches from the rug (not touching). Position it closer to the camera than the rug.
- No Card? No Problem: If you skip the card, just make sure the entire rug is 100% visible and perfectly in focus. We currently support rectangle and square rugs; you will be prompted to enter L x W during processing.
- Product-Page Photos: For the manual photos, include views that help buyers: a full rug shot, texture close-up, corner detail, backing, fringe, and a styled room context.
Step 1: Start a New Product
- Go to the Dashboard tab.
- Select Digitize New Product.
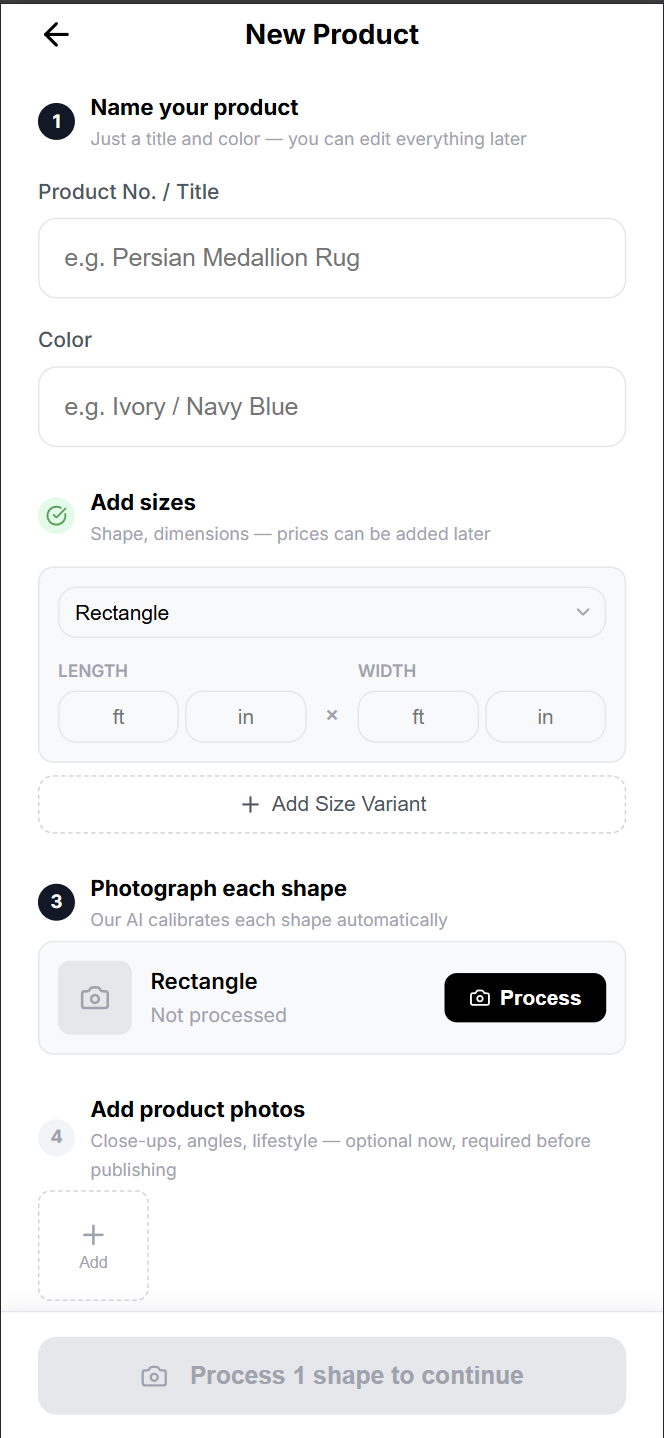
- RugSnap opens the New Product screen.

Step 2: Name Your Product
- In Product No. / Title, enter the rug’s product number or display title.
- Example:
Persian Medallion Rug - Use the name your team wants to recognize internally and review later.
- Example:
- In Color, enter the primary color description.
- Example:
Ivory / Navy Blue
- Example:
- Keep the title and color accurate; they are used later when preparing the listing.
Step 3: Add Size Variants
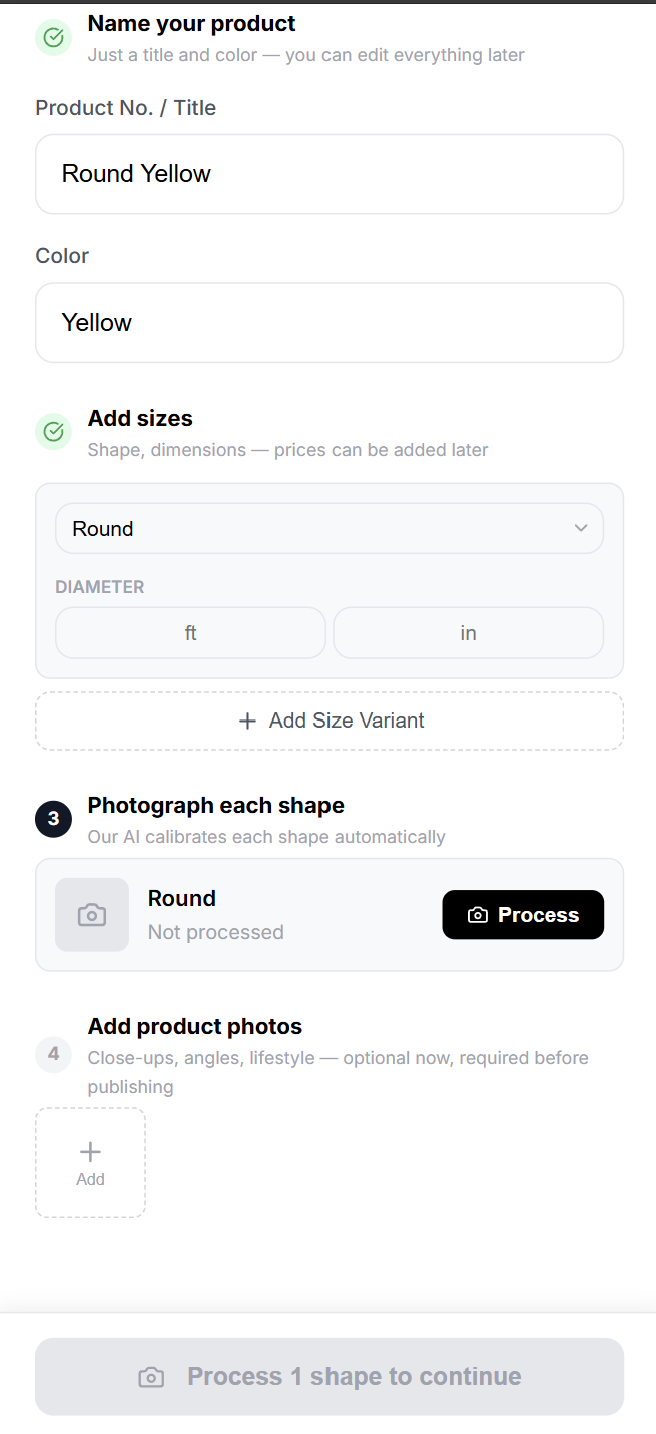
- In Add sizes, choose the correct rug Shape.
- Enter dimensions in feet and inches.
- Use the + button to Add Size Variant if the same product is available in more than one size or shape.
- Repeat until all available sizes are listed.

Supported Shapes
Rectangle · Runner · Round · Square · Oval

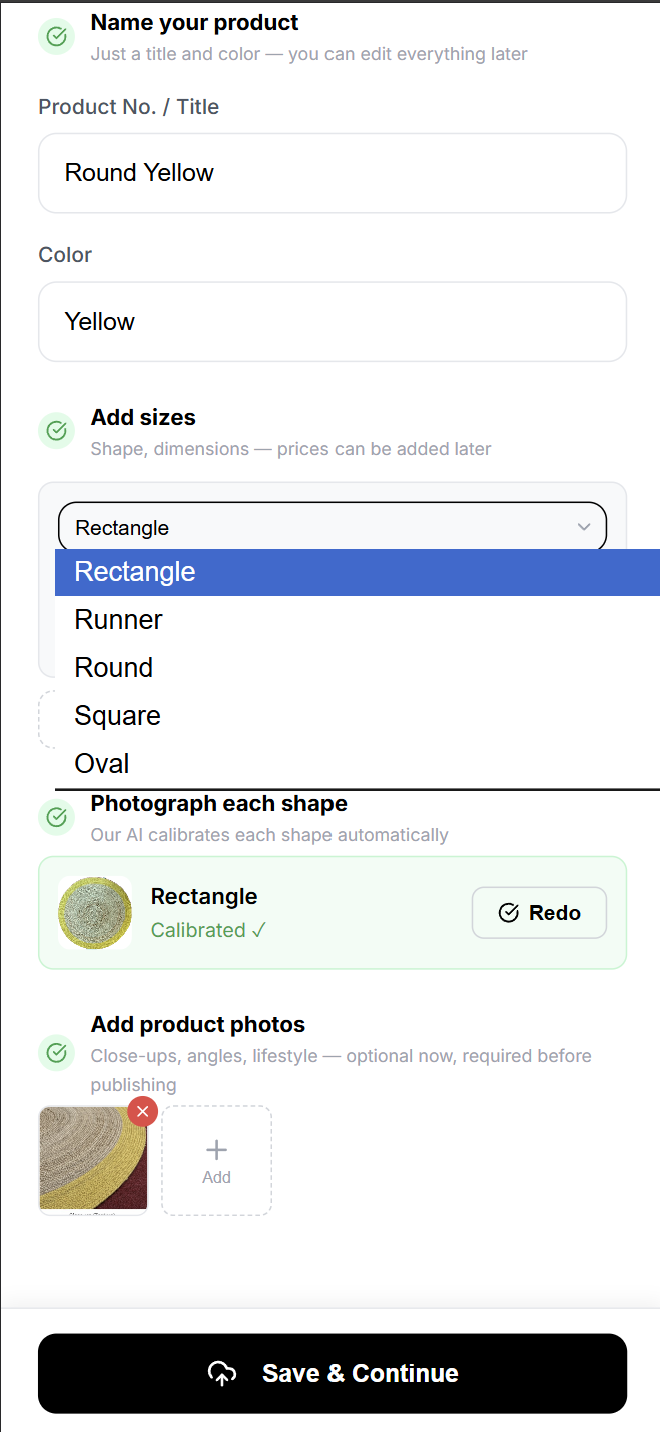
Dimension Guidance by Shape
- Rectangle / Runner — Enter length and width.
- Round — Enter diameter.
- Square — Enter one side length.
- Oval — Enter long side and short side.
Step 4: Photograph and Process Each Shape
RugSnap asks you to process one Hero photo for each unique shape in your variants. Follow the Photo Guidelines for best results.
RugSnap asks you to process one Hero photo for each unique shape in your variants.
Photo Guidelines for Best Results
- Even Lighting: Make sure the lighting is bright and even across the rug to avoid harsh shadows.
- Good Angles: Avoid taking pictures from very low or extreme side angles. The full rug should be visible and flat.
- Steady Camera: Keep the camera steady to ensure the rug outline is clear and in focus.
- Calibration Card: If using the official Discovery calibration card, place it on the floor a few inches from the rug (not touching). Position it closer to the camera than the rug.
- No Card? No Problem: If you skip the card, just make sure the entire rug is 100% visible and perfectly in focus. We currently support rectangle and square rugs; you will be prompted to enter L x W during processing.
- Product-Page Photos: For the manual photos, include views that help buyers: a full rug shot, texture close-up, corner detail, backing, fringe, and a styled room context.
- Go to Photograph each shape.
- For each shape marked Not processed, select Process.

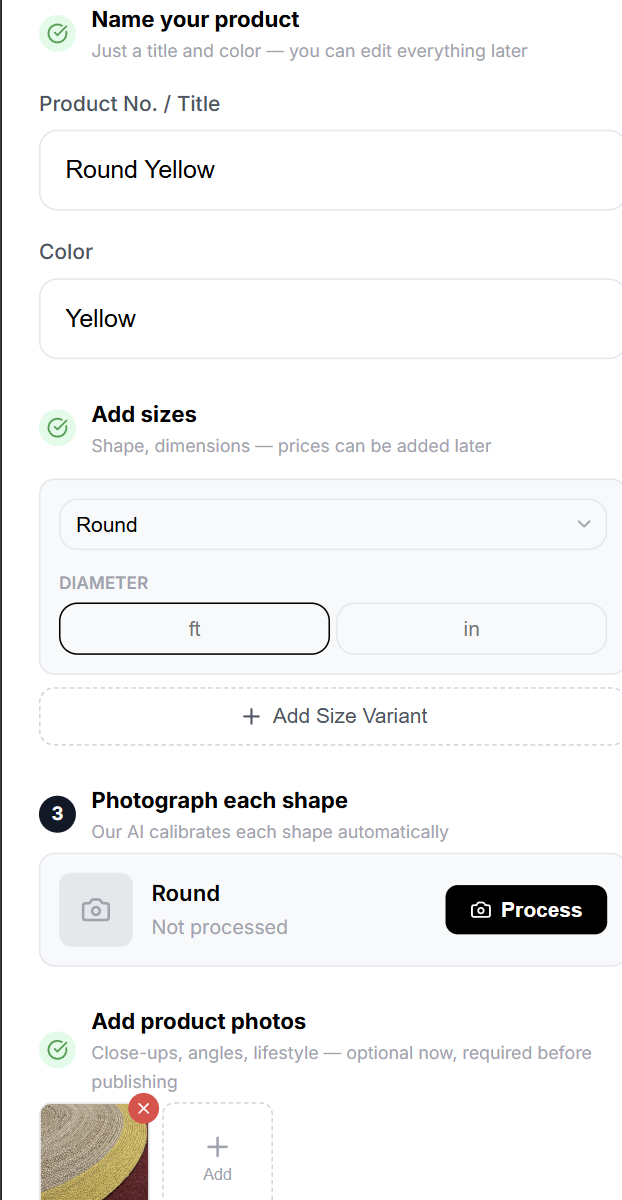
- Upload or capture the product photo when prompted.
- Wait while RugSnap processes the image. This may take a few seconds.
- You may see messages such as detecting, calibrating, generating, or finishing.
- Do not close the browser or go back while processing is active.

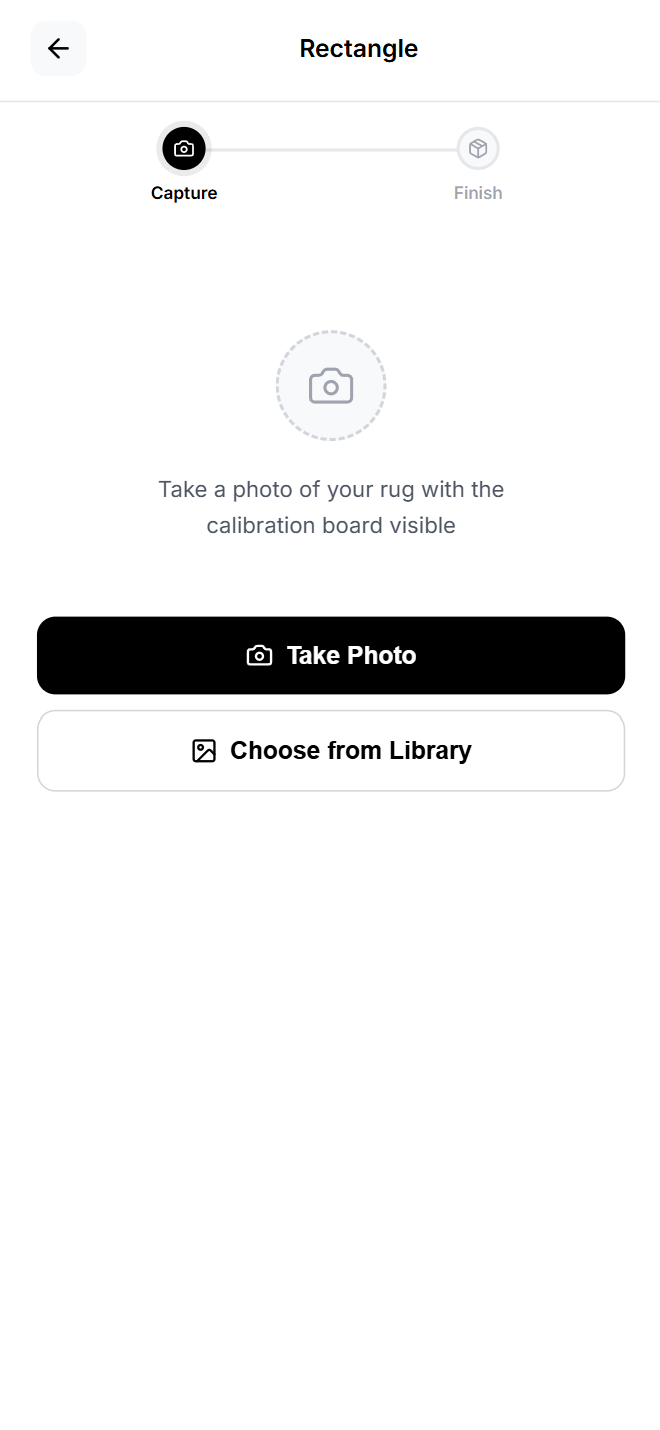

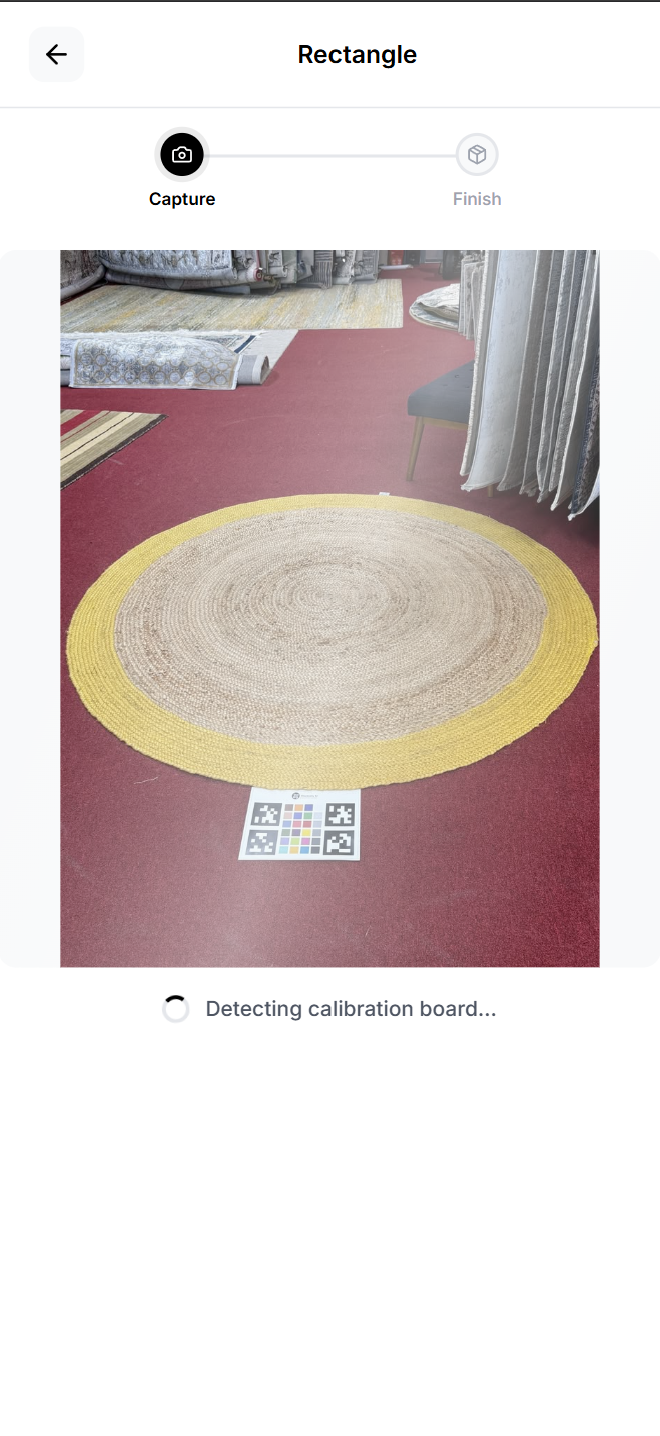
- When the master asset is saved, RugSnap shows Saved!
- You’ll Return back to the main Product Details screen.
- Repeat until every required shape says Calibrated ✓

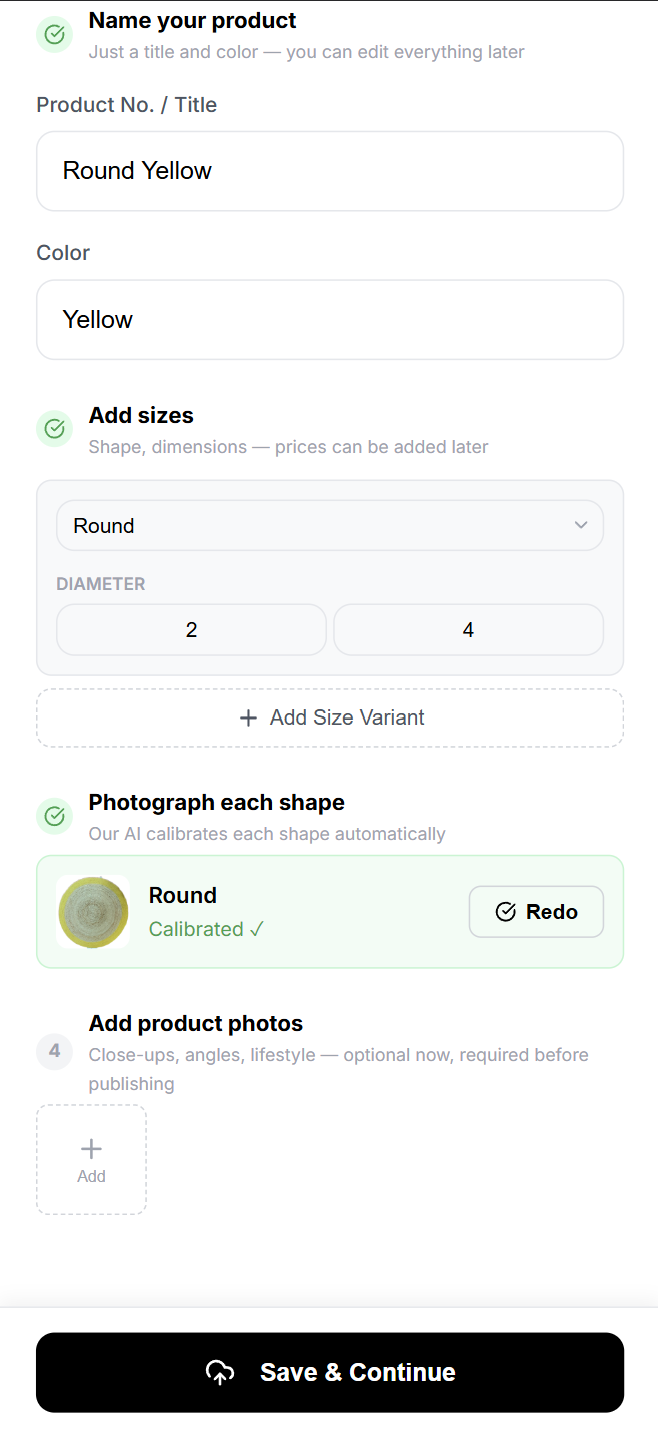
Step 5: Redo a Master Photo if Needed
- If a processed master photo does not look right, select Redo for that shape.
- Capture or upload a better photo.
- Wait for processing to complete again.
- Confirm the shape returns to Calibrated ✓
Step 6: Add Product-Page Photos
Product-page photos help shoppers understand the rug beyond the master asset.
- Go to Add product photos.
- Select Add.
- Snap or upload at least 2 photos of the rug showing the texture and pile of a rug.

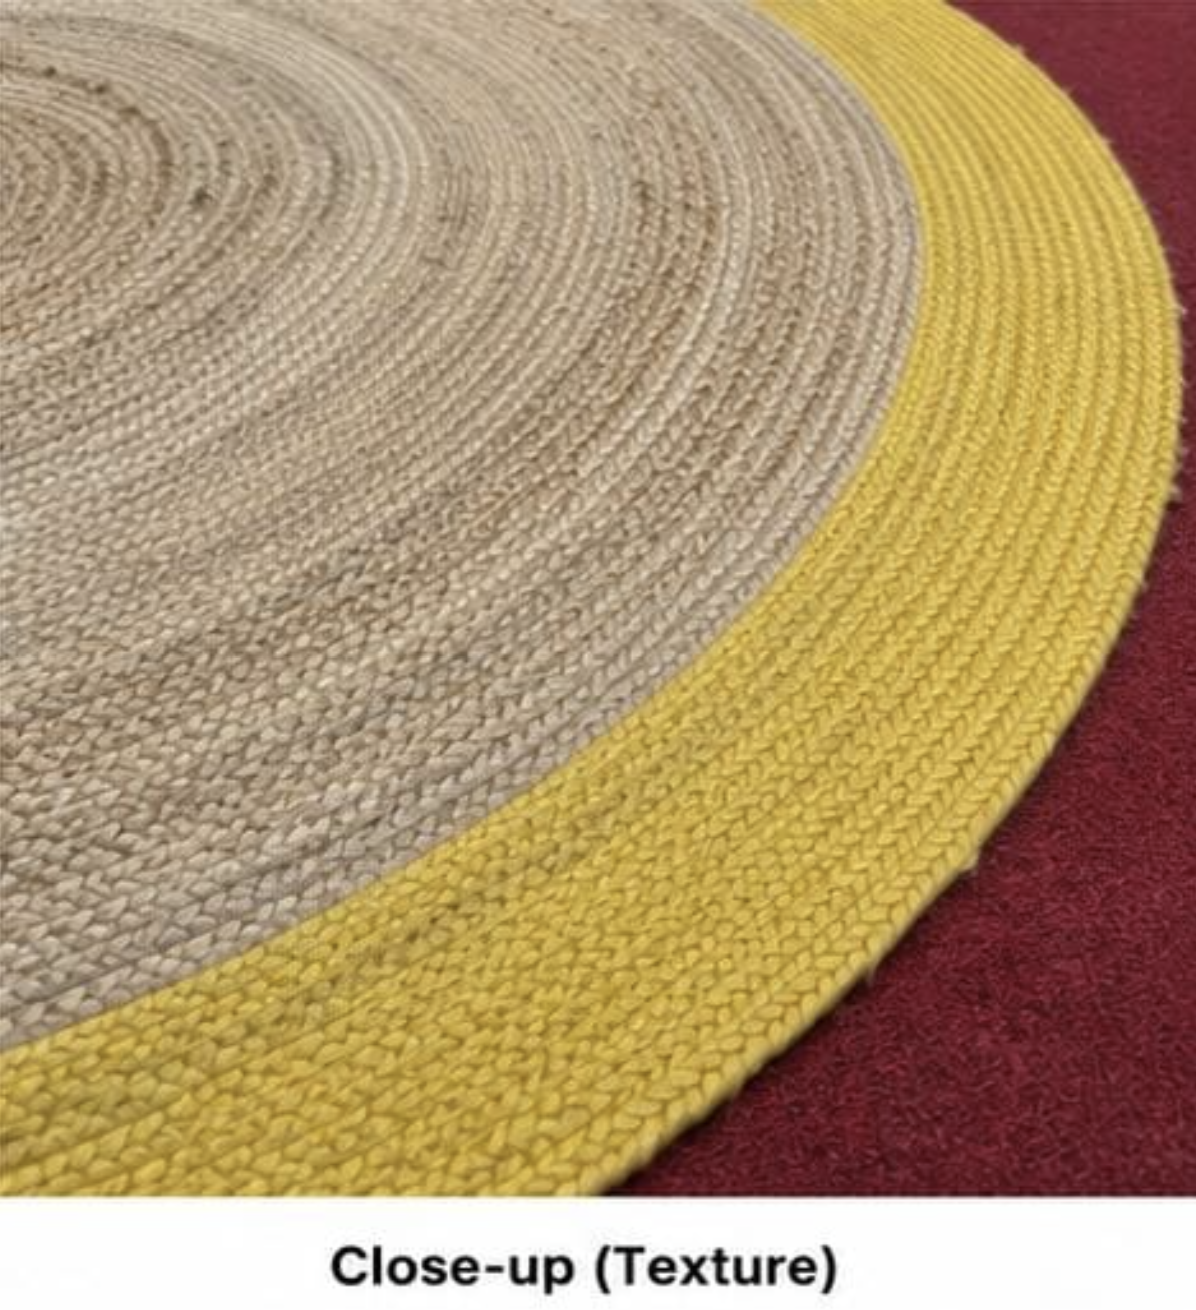
- Add useful photos such as: full rug view, texture close-up, edge or fringe detail, corner detail, backing or weave photo, room or showroom view.

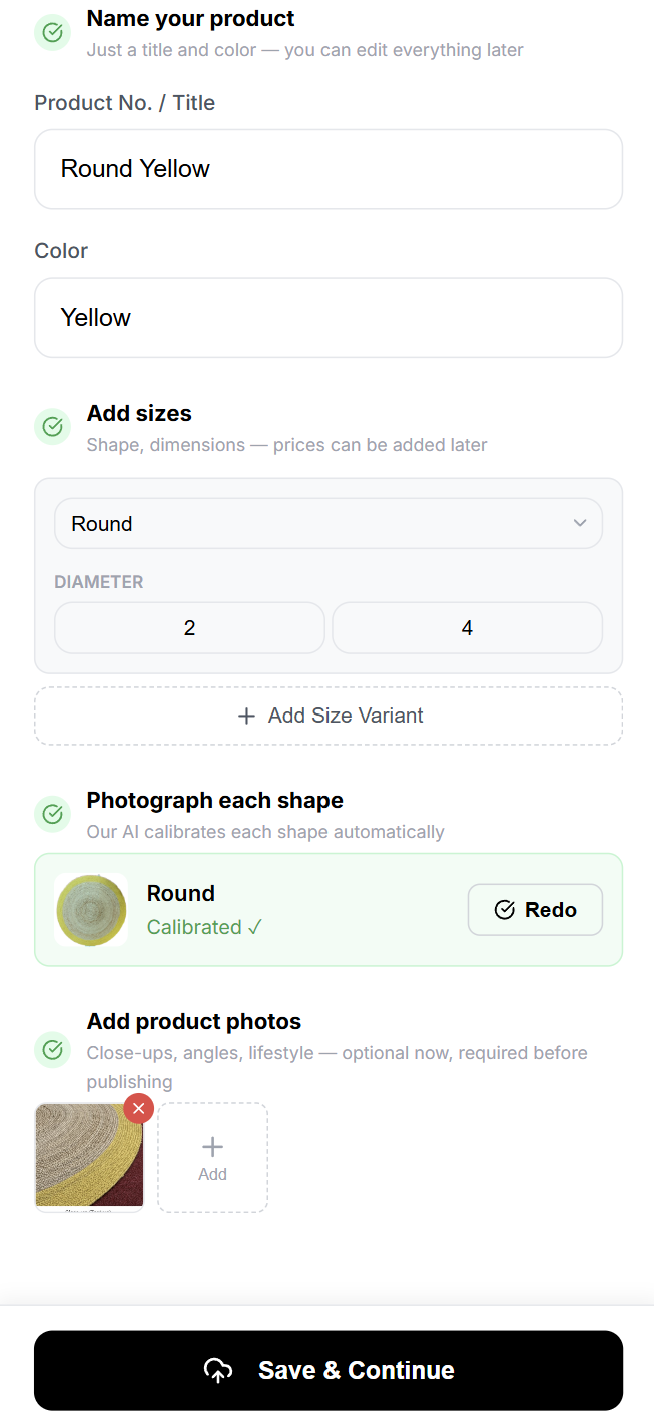
- Remove any incorrect photo using the small delete button on the photo thumbnail.
Step 7: Save the New Product
- Confirm all needed shapes show Calibrated ✓
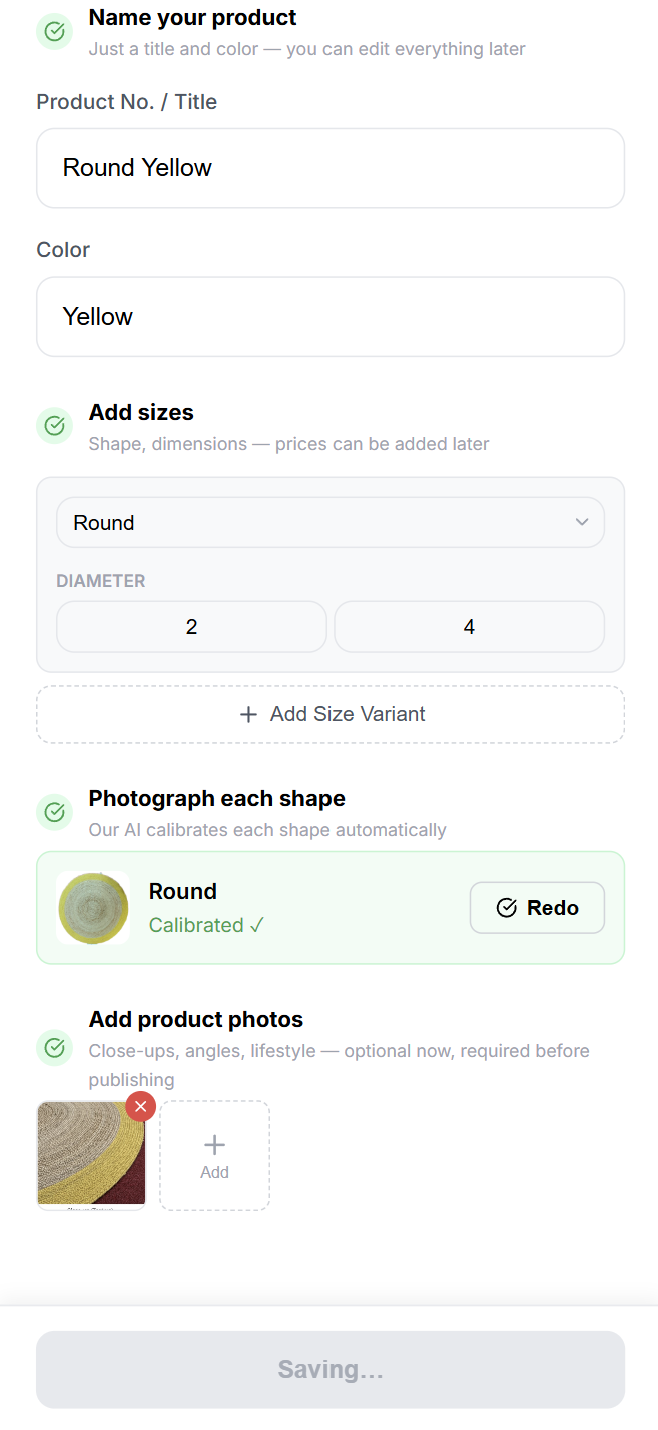
- Select Save & Continue.
- Wait until RugSnap shows the product was saved and opens the product detail page.
4 Complete the Product Detail Page
The product detail page is where you review all assets, finish listing information, check publish readiness, and publish.

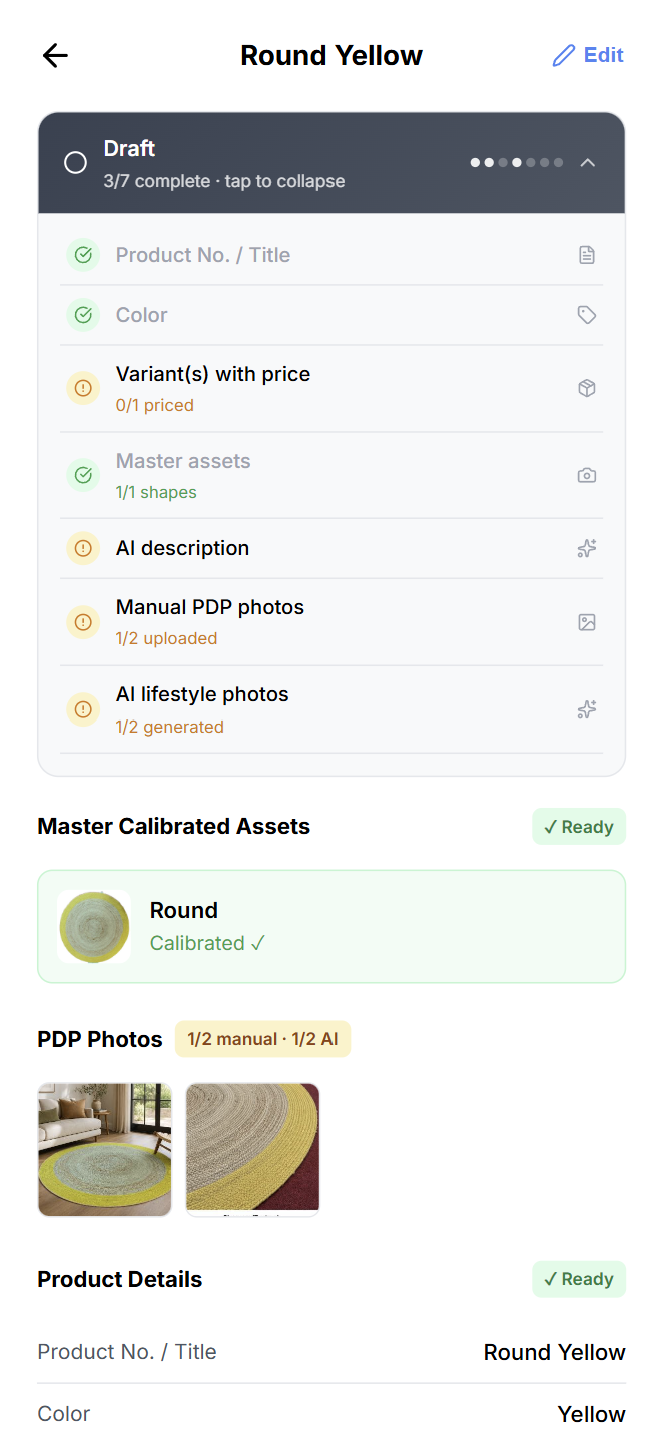
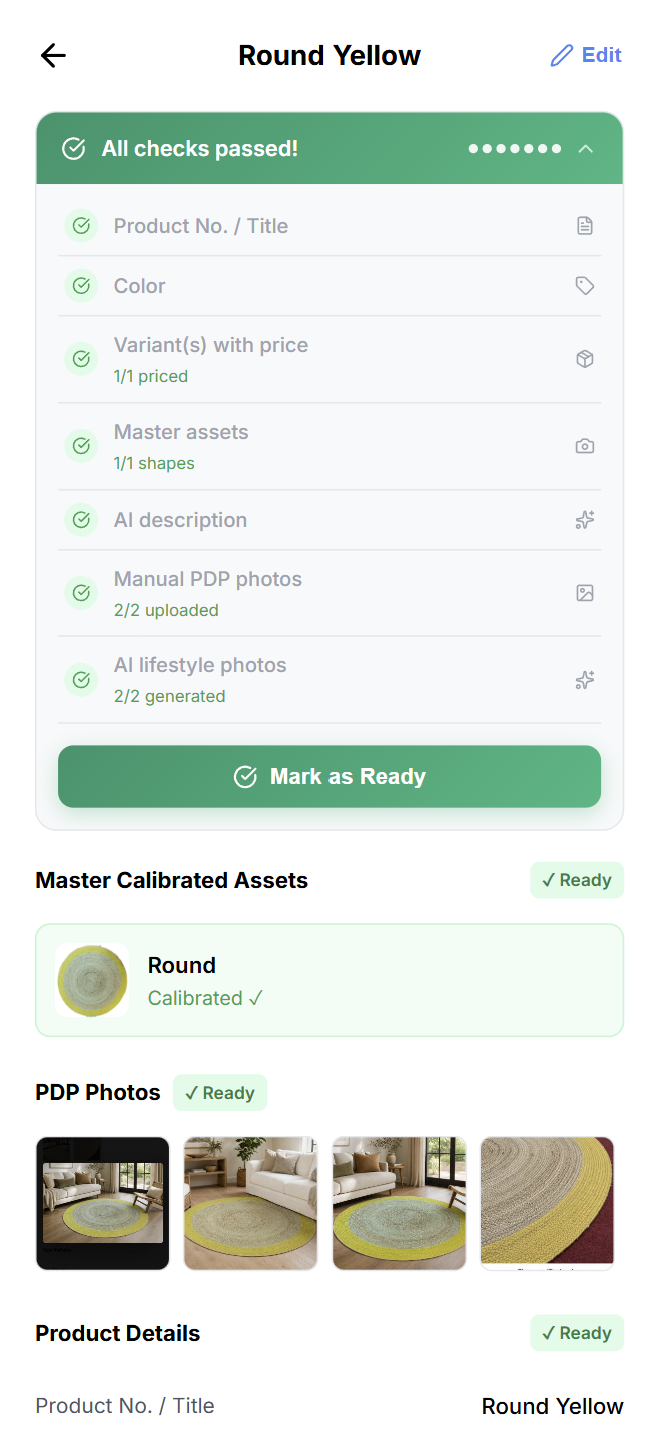
Step 1: Review the Readiness Tracker
At the top of the product detail page, RugSnap shows a status area.
- If the product is still a Draft, tap the status area to expand the readiness checklist.
- Review each required item.
- Complete any missing items before marking the product ready.
Publishing Readiness Checklist
A product is ready when the following items are complete:
- Product No. / Title
- Color
- Variant(s) with price
- Master assets for all shapes
- AI description
- Manual PDP photos (at least 2)
- AI lifestyle photos (at least 2)
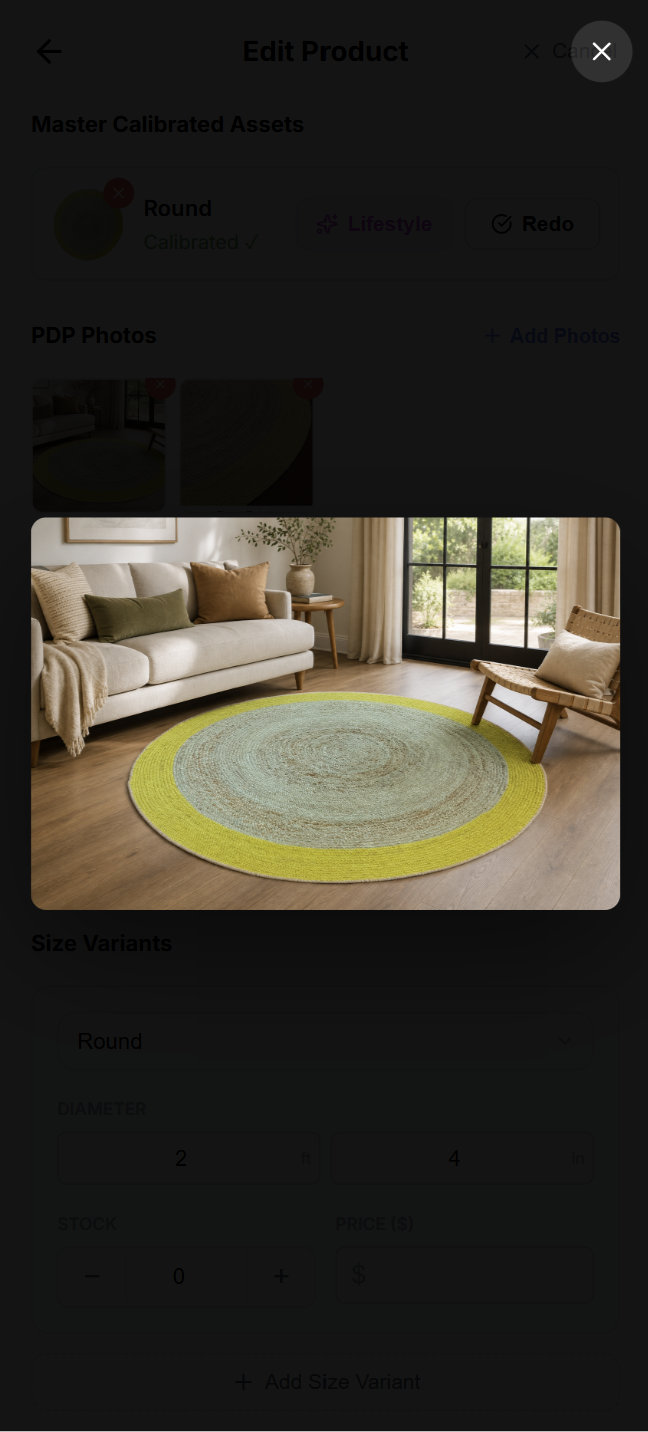
Step 2: Generate AI Lifestyle Photos
- Select ✏️Edit Mode on the top of the page. if not enabled
- Go to Master Calibrated Assets.
- Find the master asset you want to use.
- Select Lifestyle.
- The lifestyle image will be generated – Our image generation pipeline will auto save this for you.
- Repeat until you have at least two AI lifestyle photos.
- Review the photos and delete any you do not want to use.

Step 3: Add Price and Stock
- In Size Variants, review every listed size.
- Enter Stock for each variant.
- Use the plus and minus controls when convenient.
- Enter Price ($) for each variant.
- Select Save Changes if RugSnap shows the save button.
Step 4: Add or Generate Marketing Details
- Select Edit at the top of the product detail page.
- Go to Marketing & Specifications.
- Select Auto-Generate to create listing content from the product information and master photos.

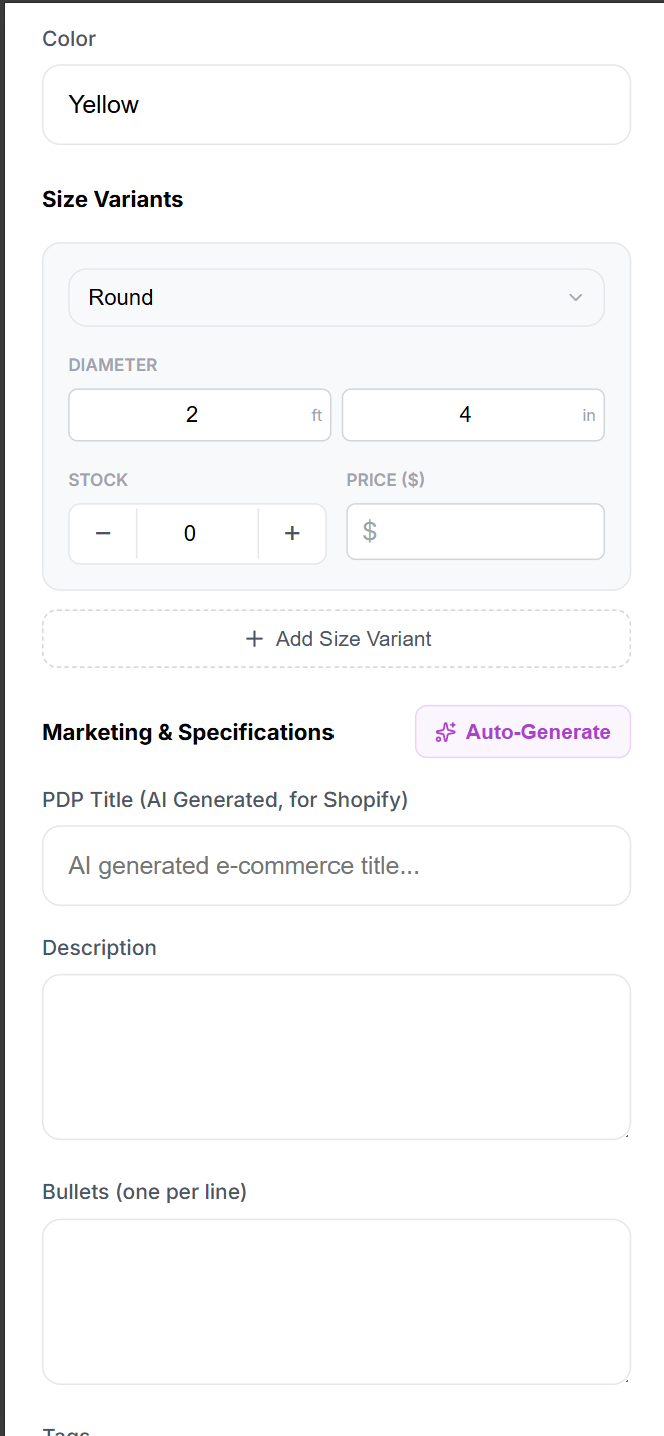
- Review the generated content carefully.

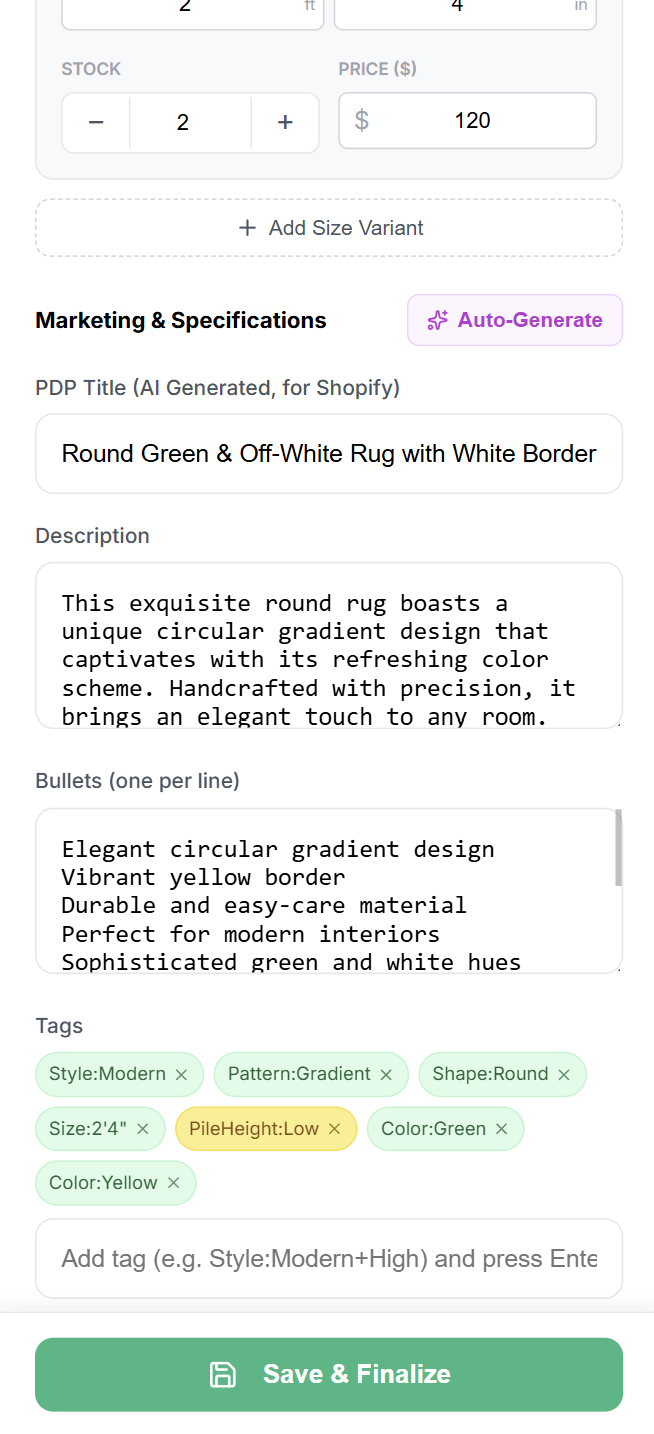
- Edit the following fields as needed:
- PDP Title for the Shopify product page.
- Description.
- Bullets, one bullet per line.
- Tags.
- Fields, such as style, material, construction, pattern, pile, or origin if available.
- Select Save & Finalize after reviewing and editing.
Step 5: Add More PDP Photos Later
- Select Edit at the top of the product detail page.
- Go to PDP Photos.
- Select Add Photos.
- Upload additional product-page images.
- Delete any unwanted photo if needed.
- Save your changes if prompted.
Step 6: Mark the Product as Ready
- Confirm every checklist item is complete.
- When the product passes all checks, select Mark as Ready.
- The status changes from Draft to Ready to Publish.

Step 7: Publish to Shopify
- When the product status is Ready to Publish, select Publish to Shopify.
- Review the confirmation message.
- Select Confirm.
- Wait for publishing to finish.
- After publishing, the product status changes to Published.
- RugSnap shows public images when they are available.

Step 8: Export the Shopify CSV
You can export a CSV for one product or for multiple published products.
Export One Product
- Open the published product detail page.
- Select Export CSV.
- Download the generated Shopify CSV file.
- Import or share the CSV according to your store’s Shopify process.
Export Multiple Published Products
- Go to the Products tab.
- Select the Published status filter.
- Select individual products or use Select All on Page.
- Select Export Shopify CSV.
- Download the generated CSV file.
5 Edit an Existing Product and Republish
Use this flow when a rug listing needs new details, new photos, corrected pricing, or replacement master images.
Step 1: Find the Product
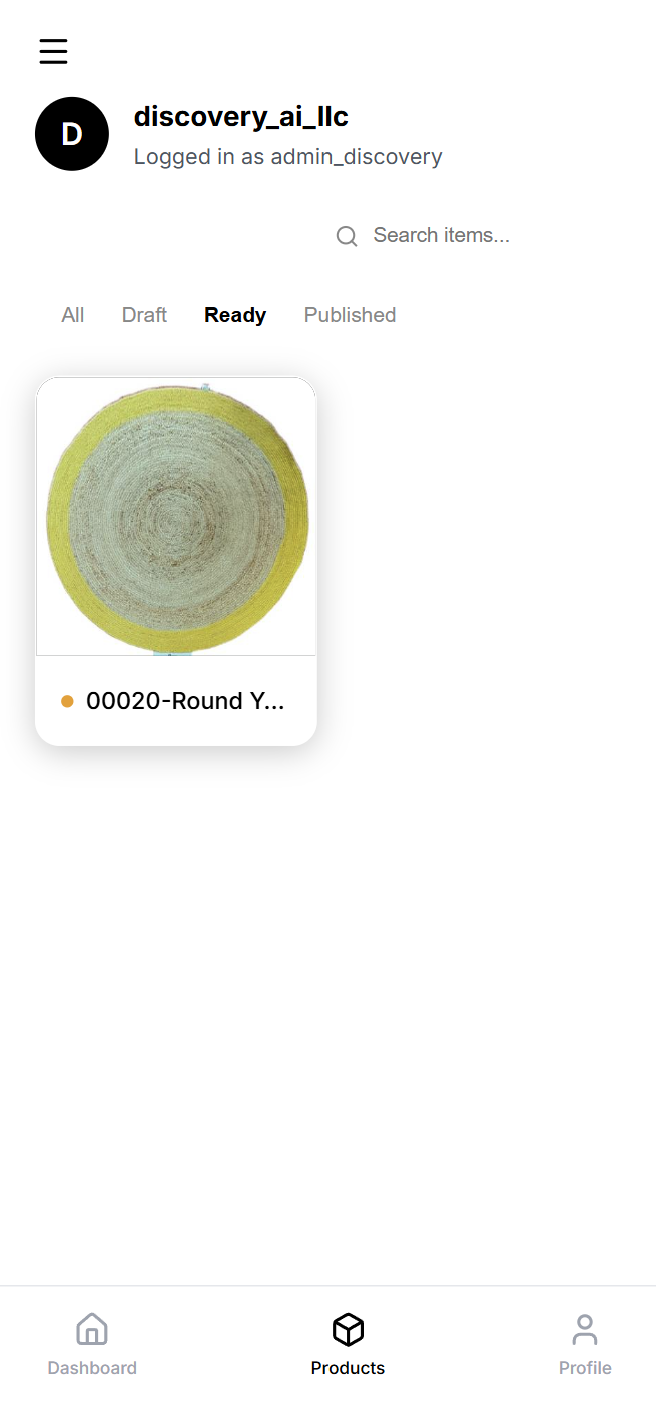
- Go to the Products tab.
- Use Search items… to search by product ID or product name.
- Use status filters if needed:
- All to see everything.
- Draft for unfinished products.
- Ready for products ready to publish.
- Published for already published products.
- Open the product card.
Step 2: Enter Edit Mode
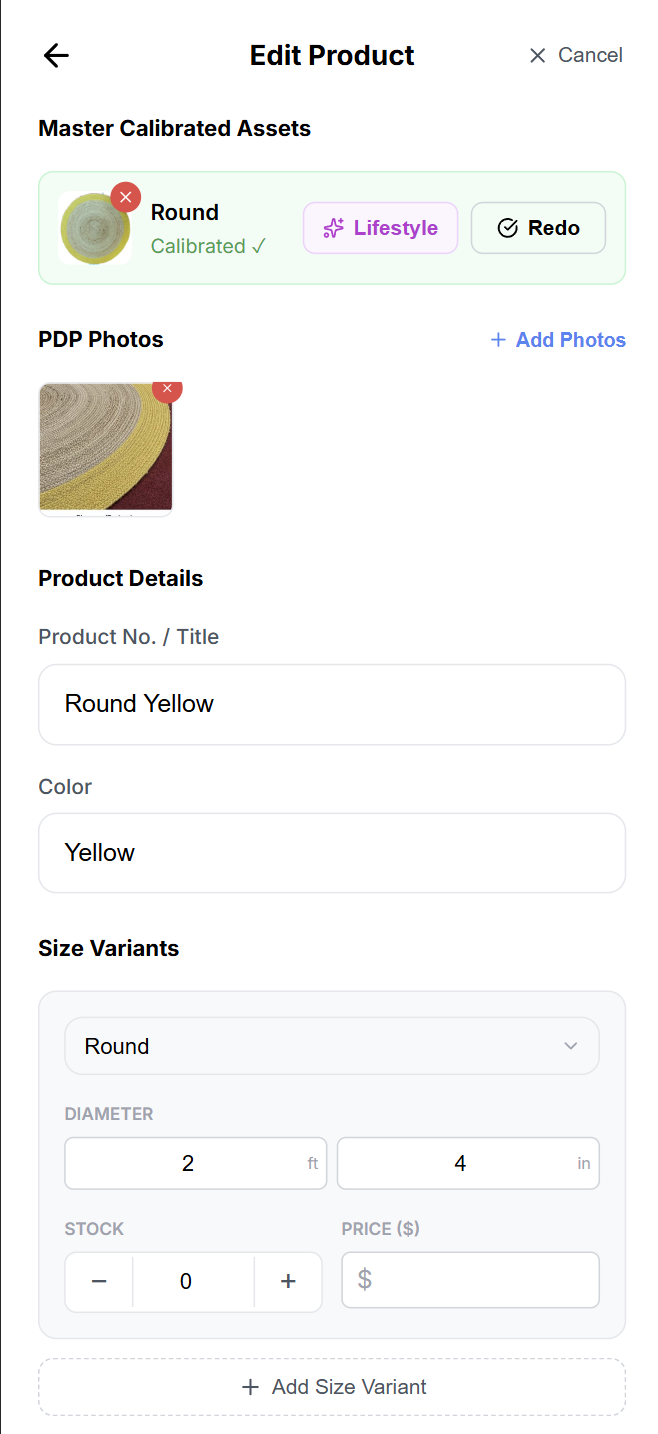
- On the product detail page, select Edit.
- Update any required section.

Step 3: Edit Product Details
- Change Product No. / Title if needed.
- Change Color if needed.
- Review that the revised information is customer-friendly and consistent with store naming standards.
Step 4: Edit Size Variants, Price, and Stock
- Update the shape or dimensions if there was an entry mistake.
- Add a new size using Add Size Variant.
- Remove an incorrect size variant when allowed.
- Update Stock.
- Update Price ($).
- Save the changes.
Step 5: Replace or Redo Master Assets
- In Master Calibrated Assets, find the shape that needs a new image.
- Select Redo.
- Upload or capture the corrected rug photo.
- Wait until processing finishes and the item shows Calibrated ✓
Step 6: Update PDP Photos
- In PDP Photos, select Add Photos to upload new images.
- Delete outdated or incorrect photos.
- Keep at least two good manual PDP photos before publishing.
Step 7: Refresh Marketing Content
- In Marketing & Specifications, select Auto-Generate if major product details or images changed.
- Review the generated content.
- Edit PDP title, description, bullets, tags, and fields as needed.
- Select Save & Finalize.
Step 8: Republish
- If the product is in Draft, complete the readiness checklist and select Mark as Ready.
- If the product is Ready, select Publish to Shopify.
- Confirm publishing.
- Export a fresh Shopify CSV if your Shopify import process requires the latest public image URLs and product data.
6 Unpublish a Product
Use unpublish when an item should no longer remain in the published export set, public images should be removed from the public publishing bucket, or the product needs to return to draft for correction.
Step 1: Open the Published Product
- Go to the Products tab.
- Select the Published filter.
- Open the product you want to unpublish.
Step 2: Select Unpublish
- On the product detail page, find the published actions.
- Select Unpublish.
- Read the confirmation message.
- Confirm only if you are sure.
Step 3: Confirm the Product Returned to Draft
- After unpublishing, the product returns to Draft status.
- Public published images are removed from the public publishing location.
- You can edit the product, complete the checklist again, mark it ready, and publish it later.
7 Other Everyday RugSnap Flows
Search for a Product
- Go to Products.
- Use the search box labeled Search items…
- Enter the product number, title, or ID you recognize.
- Open the matching product card.
Filter Products by Status
- Go to Products.
- Choose one of the status filters (All, Draft, Ready, Published).
- Use filters to focus your work queue.
Resync Products
- Go to Profile.
- Select Resync Products.
- RugSnap clears the local image cache and refreshes product data.
- Use this if images appear outdated or the product list does not look current.
Sign Out
- Go to Profile.
- Select Sign Out.
- RugSnap returns to the login screen.
8 Recommended Store Workflow
For best results, use RugSnap in this order:
- Create the product — Add title, color, all size variants.
- Process master images — Process every unique shape. Redo any photo that does not look clean.
- Add PDP photos — Upload at least two manual product-page photos. Add close-ups and details for buyer confidence.
- Complete commercial details — Add stock, add price.
- Generate marketing content — Use Auto-Generate. Review and edit the content.
- Generate lifestyle images — Create at least two AI lifestyle photos. Remove any image that does not match your selling standards.
- Mark as ready — Check all readiness items. Select Mark as Ready.
- Publish — Confirm publish. Export the Shopify CSV.
- Review in Shopify — Import the CSV. Confirm title, images, variants, price, and stock before making the listing live to shoppers.
9 Quality Checklist Before Publishing
Use this checklist before selecting Publish to Shopify:
- Product title is correct.
- Color is correct and customer-friendly.
- Every size variant is listed.
- Dimensions are accurate.
- Every variant has a price.
- Stock values are correct.
- Every required shape has a calibrated master asset.
- At least two manual PDP photos are uploaded.
- At least two AI lifestyle photos are generated and approved.
- Description is accurate.
- Bullets are clear and helpful.
- Tags and fields are relevant.
- No incorrect or duplicate photos remain.
- Product status shows Ready to Publish before final publishing.
10 Troubleshooting and Best Practices
- Closing the browser while an image is processing.
- Forgetting to add a price or stock quantity for every size variant.
- Uploading fewer than two manual PDP (product detail page) photos.
- Forgetting to generate and approve at least two AI lifestyle images.
- Taking a master photo where the rug is partially cut off.
- Forgetting to export a fresh Shopify CSV after making edits to a published product.
If Processing Seems Slow
- Stay on the page.
- Wait for the current processing message to complete.
- If RugSnap says the servers are still waking up, select Try Again.
- Do not repeatedly refresh during processing.
If You Need to Go Back During Processing
If a Product Cannot Be Marked Ready
- Open the readiness checklist.
- Complete each missing item.
- Common missing items include:
- Price on one or more variants
- Missing manual PDP photos
- Missing AI lifestyle photos
- Missing description
- Missing master asset for one shape
If Images Look Outdated
- Go to Profile.
- Select Resync Products.
- Refresh and reopen the product.
If You Published by Mistake
- Open the published product.
- Select Unpublish.
- Confirm the action.
- Make corrections in Draft status.
- Mark as Ready and publish again when finished.
Final Takeaway
RugSnap is designed to help your team digitize rug inventory in a structured way: add the product, process master assets, enrich the listing with photos and AI-assisted content, complete the readiness checklist, publish, and export a Shopify-ready CSV. Follow the steps in this guide for every product so your digital catalog stays accurate, consistent, and ready for customers to shop.